The rear end is done and the bodywork is nearing completion so I'm slowly turning my thoughts to what comes next...
Stacks and filters
One of those things that immediately grabs your attention when you open the engine bay on a 356 are the air filters. The original Pre-A's used dual single Solex carburettors moving on to the two barrel P40 Solex carburettors for the later 1600's and both setups used Knecht air filters which are visually distinctive in both cases both having the raised pressed Knecht logo on the top of the filters.
Beehives
I finally pulled the trigger on a set of beehives. I've long wanted to replace the not-quite-correct Lucas style 'beehives' with the correct style units and could resist no more when I saw these for sale.
It's inside
Been a while since anything has happened on the speedster. Not that there is anything to really report, but I did manage to tick off a couple of small jobs recently
Mail Call
Funky green dog legs
Pretty much the last panel required.
(although we're replacing the drivers door with a better one)
Quick update
Received an update from the shop. Front inner panel and passenger door are fitted up. Starting to look like a bus again.
Nose Job
Just a quick update. The shop has just taken delivery of the front panels for the bus. We decided to go for an all-in-one front sub-panel instead of separate panels as not only is it assembled on a jig and so should hopefully be nice and square, but it will also save a heap of time compared to assembling the individual panels on the bus.
Resto Progress June '21
Received an update on the bus's progress. It's really coming along now. The gaps on the cargo doors are spot on which when you consider how trashed the roof and that side of the bus was is a real feat. Cooper has really outdone himself.
O/T Crank Pulley
Keeping with my vintage speed 356 inspired Okrasa engine build I bought a nice O/T crank pulley. These four hole items are found on early 356's.
356 Oil Filler / Breather
Another piece in the puzzle arrived today. Todays treasure is a 356 oil filler neck.
Fram Bypass Filter
For an authentic looking engine bay a Fram or Mann style bypass oil filter is a good nod to the original 356 engines and will definitely help give your engine bay that vintage Porsche look. Bypass filters are often dismissed as old hat and inferior to full flow style filters, but is that actually the case?
Okrasa 1625cc
Been a bit flat out with work so no real time to do anything on the build but have been doing a bit of daydreaming whilst standing at the lathe. I've somehow convinced myself that I should put together my Okrasa engine for the Speedster.
Silencer End Pressings
After completing the collector for my DIY Sebring exhaust the next part that I need to tackle is making the silencers. I have already spent a bit of time doing some research to try and find some off-the-shelf items but due to the small size needed I could not find anything available that could be used without having to modify it. This means that the only option left is to make them myself.
Sebring Exhaust Part 3
Managed to scrounge a few minutes to finish off the collector for the Sebring exhaust tonight. I had ran out of gas when I was initially welding up the collector and so still had to join the two halves together. Today I managed to get a few minutes to finish them. I spent a little time tidying up the insides so that the two halves were symmetrical and then welded the two halves together to finish off the collector. I also trimmed down the uneven ends so that everything is ready for the next stage.
Glaser Karosserie
Many 356 fans will know of the name Reuter, the coach builder responsible for the manufacture of the Porsche 356 from 1950 onwards, but many do not realise that initially Reuter did not have the capacity to build the convertible models so this task was awarded to Glaser, the renowned East German coach builder.
Sebring Exhaust Part 2
If you read my previous post Sebring Exhaust Part 1 you would know that I have decided to build my own Sebring style exhaust.
This evening I managed to get a little time to make a start on it.
Mail Call - Brake Discs
Got some more goodies today, my new front brake discs. These took a while to source as everyone has been out of stock since before Xmas.
Sebring Exhaust Part 1
A Sebring style exhaust is something that I have been planning for a long while. Whilst it's not the best style of header to use from a performance perspective, it does have that iconic Porsche racing style to it and so is the perfect choice for a period looking car.
Aluminium Badges
Building an early replica has been a bit of a challenge in some areas. The Late 50's cars have a pretty good availability for trim and parts as most parts are now remanufactured. The early cars however have a number of differences from those late parts which means that in many cases, to be correct the late parts cannot be used. One such case is the Porsche scripts.
SCCSA Grille Badge
It seems to be a tradition amongst replica 356 owners to have a period grille badge. Not being a fan of fake Outlaw 356 or Cliche'd Nurburgring badges I've been on the lookout for something more suitable.
Mail Call
It's been an exciting week for deliveries. Got another parcel today. Can you guess what it is?
Mail call
Received some more goodies in the post.
Early style rear lights and a red lense for my shine down light so that I can use it is a third brake light
The missing link
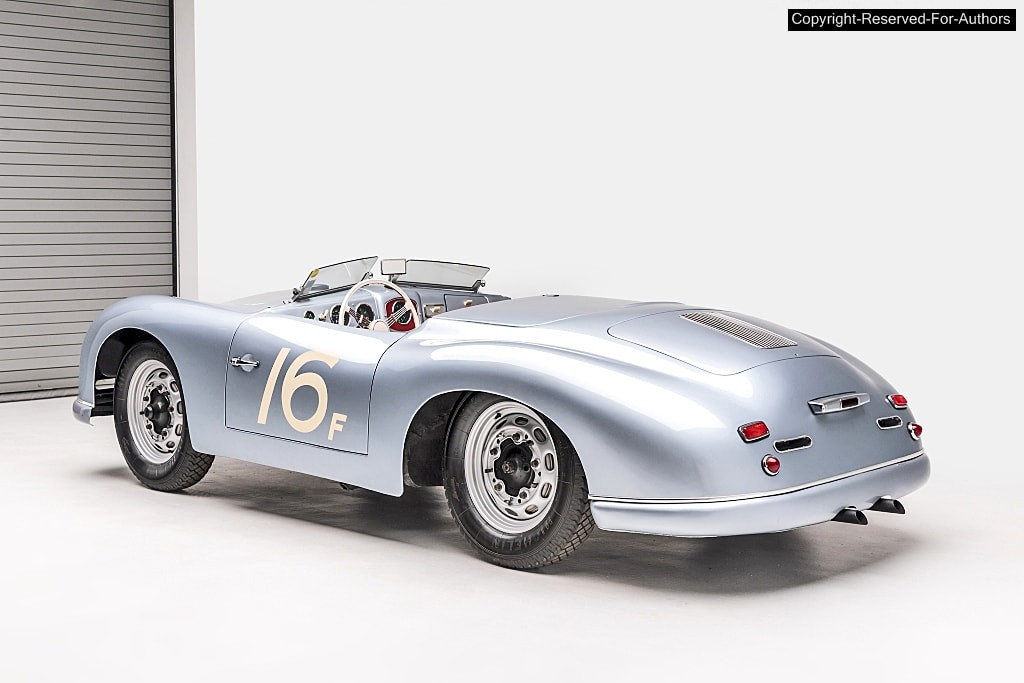
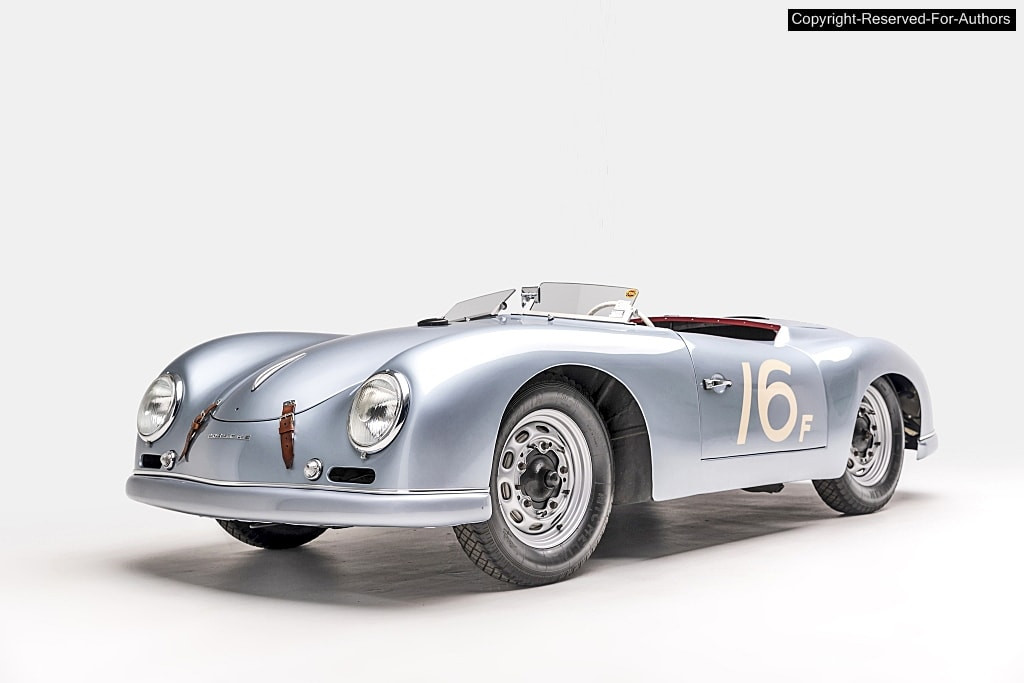
Some of you may know that I'm trying to make my car look like a 'missing-link' car, something that might have come between the Pre-A cabs and the Speedster. Whilst the Max Hoffman commissioned America Roadster (shown below) is the actual link between these cars, it has very different body lines to either the orignal convertibles or the Speedsters and to me seems very out of place in the family tree. There are actually a few cars out there that fit in with this genealogy much better than the America Roadster; Take a Pre-A cabriolet and fit a low style windscreen or aero shields instead of the original and you have a very convincing missing-link car, a car that fits in much better than the America Roadster.

Door Capping - Part Deux
After a successful trial making a steel door garnish, I decided to have a go at making the complete thing.
Door Capping
I've long wanted to make some original style steel door cappings for my speedster. Whilst repros can be purchased they seem to be almost as expensive as my car. Karmann Konnection in the UK have some listed at AU$1k for the pair. Far too rich for my taste.
So I decided to make a small test and build a prototype to see if I could figure out the best techniques for making them.
Carrera style fuel tank - Part 1
Just a quick update. Not much has been happening on the project as I've been tied up with work. But I did manage to grab a quick 5 minutes today to make a start on the fuel tank...
Mail Call
Picked up these pre-loved side screens from thesamba. Big thanks to Patrick Brown for the heads up on these. Loving the aged look of these. Very reasonably priced too.
I believe that these might be a period aftermarket accessory. I've seen a couple of sets fitted to original cars. They are formed from aluminium extrusions and welded together and generally nicely finished.
DIY Pre-A Handbrake - Part 2
In this episode I assemble the parts and drink some coffee.
Well, that's more-or-less what happened...
My DIY Pre-A handbrake
Got the handbrake parts back from the water jet cutters today. They need a bit of revision but look like they will work (always a win for a prototype).
First blush, material is too thick, also main body is a bit too substantial (may change this to aluminium). The entire assembly looks a bit cumbersome, but then the originals are a bit like that too. The trigger was actually supposed to be thinner gauge than the rest of the parts as it needs to be pressed into shape., unfortunately it's not going to be easy to bend into shape without a bit of heat. (oops) I stuffed up and forgot to spec that on the drawing. (D'oh!).
Of course these things rarely work out perfect first go around so no real biggie. I think that it will work fine as it is, but is probably just a bit TOO big. Really need to get it made up and on the car to check that the functionality is going to work out okay, but from what I've seen so far, I'm not expecting any major issues.
Making my steering column fit.
The great thing about non-standard parts is that somehow you need to make them fit.
You will recall in previous posts that I've been chipping away at making the steering wheel fit. First making it fit the column, then making the column support, then making a nice fancy horn push and now the ultimate culmination of the steering wheel saga making the steering column fit the car.
Steering column bush
Not too much progress to report. Although I did make a steering column bush for the hybrid steering column setup I'm building.
I'm not 100% sold on the black nylon, however the white was simply too white and new looking. I figured black would look a little more like bakelite.
Now all I need to do is cut and shut the crash can and hook the column up
Wiring Loom
Had a spare 5 mins today so decided to take a look at the wiring loom on the Speedster project to try and figure out what I have and what's needed. I wasn't really sure what came with the car except that there was a carrier bag with what looked like a wiring loom in it.
Horn Push Finished
I finally got around to finishing off my horn push project.
Horn Push Badge
A while back I bought this awesome three spoked steering wheel from Ned Faux. It's much like a barndoor or early split bug wheel but not actually a VW item so unfortunately doesn't fit a VW steering column. But as I'd been looking for a barndoor or country buggy steering wheel for a while and figured that it was too good a price to turn down, so somehow I would make it fit. Plus it has an awesome patina to it, which will look just right in the speedster.
800W electric heater
Bought one of these heater units for the demisters. It's pretty compact and chucks out a fair bit of heat. Probably enough to keep the cabin warm on cold days. Was pretty cheap too. Perfect if you need to have working demisters like here in Aus.
Rawhide
Rollin, rollin, rollin...
I had a bit of a brainwave. I've pretty much decided that the car is going to be finished in a faux-patina and hopefully emulating an original survivor speedster / race car / outlaw. I may paint it properly later, but for the time being it's going to be the quickest way to get it presentable(ish) and on the road.
DIY Speedster Steering Column Clamp
Haven't done anything on the speedster for a while so was happy to grab a few hours today. I decided to take a look at the steering column with a view of getting the new column installed and mounted up. There's a few jobs to do before I can swap out the late column that's currently fitted. I managed to source an early beetle outer column tube from a mate but needed to figure out how to get it to work with what I had and how I wanted it to look following my overall plan of trying to make it look like an early car. Ideally I would love to swap the dash for a pre-A dash but my plan is simply to use as many early styling cues as I can whilst still working with what I have
Bosch Symmetrical Headlight Lense
Managed to trade for an second early style Bosch symmetrical headlight lense. I already had one of these but was missing it's partner.
Now I have two. :)
I'll swap the slightly later hella ones I have on there now out for these period correct ones.
Umbrella Handbrake
One thing that I dislike about the VW based speedster kits is that they all have the handbrake in-between the seats, rather than under the dashboard like the originals, which is an obvious giveaway on its provenance. So this has always been on my list of things to change with my kit. Of course it will only fool the casual observer but it's these small details that set some projects aside from others.
Hood frame has finally arrived
After a four month wait my hood frame, windscreen frame, side screens and hood cover has finally arrived. Happy days. Now I just need to figure out how it mounts in the car. Looking forwards to getting the hood frame installed so that I can make the car weatherproof.
Gauges Finished (Kinda)
Finished off the gauges this evening. Scaled the fascias down to fit and printed out a few test prints. I initially tried to print onto transparent water decal paper but found that the ink was not vibrant enough and did not show up that great on the black background. This was a shame as the transparent decal paper works a lot better then the white.
So unfortunately I was forced to use the white paper so that the green numerals were visible. This had one unfortunate side effect - that the white edge of the paper was clearly visible in a few areas against the black background.
Gauge bezels finished
Sanded the faces back last night and offered them up. Pretty stoked with how they are looking so far. Just need to scale the decals and print them out. Not too sure how the green will look over the black face. Guess I will soon find out.
DIY Gauge Bezels
Made a start on the gauge faces today. I tuned down some bezels for the centre of the gauges. The bezels are to make the 914 gauges look more like the original 356 style of gauges. I made them out of aluminium stock which will polish up nice and easily. I spent a bit of time and cut out the individual odometer and trip counter holes on the speedo bezel. I also stripped and painted the gauge faces. Once the paint has had a chance to dry I will sand back the paint from the rim of the bezels and give it a bit of a polish.
Combo Gauge Update
A little more progress, removed the red screen from the kombo gauge to install the 911 temp gauge. The gauge pod and temp insert are a direct swap, the only real difference is that on the 914 the gauges are arrange on top and bottom whereas on the 911 they are side by side. The 356 shares the top / bottom orientation and has similar warning light locations so I will use the 914 pod and fascia. One interesting thing that I noticed when I removed the gauge was that hidden behind the fascia at the very top of the gauge face there are numerical temperature graduations. evidently 150 is regarded as too hot (the beginning of the red zone). The 911 style white bars will be replaced with the early style 356 green numerical style when I redo the faces.
Flip-top filler cap
Finished off the gauge faces today, now I just need to print them up and try them out. Also received a 550 style flip top filler cap in the post courtesy of Ebay. Need to make up a new filler neck for the tank and cut a hole in the bonnet to fit this. For some reason, whilst my tank has been converted to a central filler location it does not stand upright (see photos above) not a massive drama to sort and will give me a chance to make up a proper rain tray. The cap is made from aluminium so will polish up alright but to tell the truth I'm kinda digging the patina on it.
Gauge face design
Started to draft up the images for the replacement gauge fronts, so far I have managed to get the tacho done. The process basically involves scanning the original face to get a basic image showing the locations of the markers. Then drafting a new image using the old markers as a point of reference. I've matched the font to one very similar to the original 356 A gauge font and also take a grab of the colours. The end result is an image that looks very similar to the original style gauge but with the correct scaling for the 914 gauge. The centre tacho in the image is the new version, the outer two images are early and late style facias.
914 Gauges
I found a cheap set of early 914 gauges on Ebay that were simply too cheap to pass up. The plan is to give them a bit of an overhaul and update the faces to match the original 356 style. The tacho on the 914 is slightly larger than the other gauges whereas on the 356 they are all the same size. Having seen 914 gauges fitted to other 356's it doesn't really notice too much. North Hollywood Speedos can convert these to look like 356 gauges but at some around AU$1k it would be cheaper to buy some reproduction gauges. The thing that has really turned me off of getting repro gauges is that the trip meter and odometer is a nastly little LCD screen. Yuk.
Speedweek 2016
The trip to this years Speedweek actually started seven years ago back in 2009; the first time that I visited Lake Gairdner. Myself and a mate had tried to get out there a few years before in 2007, but rain and bad track conditions had meant that the event was cancelled in both 2007 and 2008. In 2009 we rented a cottage in Kimba and commuted the 2 hours or so out to the lake every day. From the first moment on the lake I was hooked, it's completely inspiring to be there, stuck in the middle of nowhere, in one of the most surreal places you'll ever visit. Real grass roots stuff, not a corporate cash cow, but blokes like you and me, making stuff in their sheds that they drag from wherever on a journey that includes two or three hours over unsealed roads. Even as a spectator the commitment required to get there is immense.
It Lives
Its been a quiet couple of months, the oval went onto the back burner whilst we led up to the xmas break - its a really busy time for me at work and with the bit of time that i did get off over the xmas break I found myself building a pond int he back garden. Not that I'm complaining as the garden was missing a little tranquility, the pond provides a great place to sit and contemplate whilst having a cuppa...
DIY Velocity stack
The 1600 single port build that I have been working on is using a Mikuni carburetor. These are normally found on Harley Davidsons and are fitted with filter covers. Whilst there's a lot of different bling style jewelry air filter cover available (Harley owners generally seem to be some of the worst for bling) this was no good for the 1600S/P build. What I really wanted was a nice velocity stack to finish things off.
915 clutch pull to push
If you read my last post - 'Hydraulic clutch slave' which was about fitting a hydraulic clutch to a Porsche 915 gearbox you might have thought that it was a good solution to an otherwise difficult issue to solve. Well that is what I thought until I tried to fit everything together. What I actually found was that the slave cylinder that I used was too long and meant that it fouled on the clutch assembly when the engine was installed in the gearbox. With limited time to buy and fit another shorter unit I decided to look at converting the old pull style 915 clutch release to a traditional push style.
Hydraulic clutch slave
The one part of the oval project that has given me the the most challenges is the 915 gearbox conversion. Most people that opt to go down the Porsche 5 speed route use the much easier to fit 901 gearbox from the Porsche 914 / 912. Whilst not as strong as the later 915 box it shares the VW mountings, uses a cable pull style clutch and is much simpler to install. I opted to go with the 915 as the 901 was not suitable for the power of the big Type 4 that I had planned to hook up to it, plus I did not like the dogleg shift pattern of the 901.
Blown 1600 SP
I recently attended a local SATA meeting. The SATA (or South Australian Timing Association as they are also known) are a small group of racers who have got together to promote and create South Australian land speed racing events. They have successfully held a few test and tune days both at Tailem Bend and at Waikerie Airstrip and have planned another next month. The next Test and Tune event is on November 8th at Waikerie. Only three weeks away.
Whilst there is absolutely no way that I will get the engine finished in time, there is a chance that I could get the car finished and install another engine in it. at least this would allow me to do a shakedown and make sure that the gearbox is working properly.
Seat upholstery
Whilst we were making the pop top we did take the time to make up some patterns for the front seats and cut out the material but that was as far as we got. Having not done any form of upholstery before trying to figure out the best way of doing things was pretty hard. Google is pretty good, but even after finding some good videos online there were some details that they just glossed over. In the end the covers just got left and no more was done.
Blower Drive Pulleys
Speedweek 2016 is at the end of February which is not really too far away. Whilst there's not too much to do on the Oval there's still heaps when I take into account how little time I actually get to concentrate on one project. In addition to Speedweek it looks like the SATA are putting together a speed trial at Waikerie. This will be open to SATA members and SATA / SCTA compatible cars and bikes. This is great news and is exactly what I was hoping for except that the meet is to be held on November 18th which leaves just a shade over a month to get everything together. Now of course I'm not going to kid myself that I can make it happen, but if I put another engine in that I happen to have already built and laying around the garage I recon I might be in with a chance of at least doing some shakedown testing on the car itself.
Split bus engine hatch repair

During the school holidays I wanted to get something achieved on the bus, so I decided to tackle the broken engine lid hinge mounts. Took a little longer than I had expected but it came up not too bad.
A few pics showing the damage and areas in need of repair...
DIY Safari Frames Part 2
If you follow my blog or have read my previous article DIY Safari frames you're probably aware that I have been trying to roll a curve in aluminium extrusion so that I can make up my own rear safari window for the Lowlight.
Last week the fruits of my labor ended up splitting the aluminium but after doing some pondering this week I realised that the extruded profile was not being supported correctly. The dies that I had made left the edge of the aluminium un-supported which resulted in the profile splitting.
DIY Safari Frames
There's a bit of a rust issue with the tailgate on the lowlight which is also causing a bit of a leak and water to get into the bus. The rust is on the bottom of the window under the window rubber so to repair it the rear glass will need to come out. Whilst pondering the best way to fix it I had a great idea - why not replace the rear window with an opening 'safari' window. This way I could make the repair to the rust at my leisure rather than having to get it done in a hurry.
36 horse progress
Its been a fair while since I've had the time to sit down and put a progress report together, in fact the last post I made was back in January. This is mostly due to being flat out working on the car getting it ready for Speedweek. Well Speedweek has come and gone and despite putting in the hard yards in I did not get to compete. I had set myself the goal of getting everything together with engine in and running by no later than the end of February. I figured that this way I would still be able to do some tuning and get out to the lake with a relatively good chance of making it through the week with no major dramas. Unfortunately, I did not get it together by the deadline. I was very close and could have pushed to get it done but this was the exact situation I sought to avoid when I set myself the February deadline. There's nothing like a rushed build to promote silly mistakes and expensive failures.
1963 Bus dash repair
A little while ago I repaired the damaged part of the dash for the wiper switch on my '63 Bus.
Overall very happy with the end result, still needs a bit of work but its no problems.
I will let the pics do the talking!
Interior panelling
I've been pretty busy over the past few weeks trying to get the shell and running gear finished so that I can make a start on building the engine. The body is pretty straight and only needs a few small patches welded in but having cut out the rear floor (for a variety of reasons) I needed to make up some interior panelling. After some deliberation I decided to go with aluminium panelling simply as it is easier to work with and requires no finishing. I had originally wanted to make the panelling and door trims out of reclaimed corrugated fence panels - the stuff you would typically see on a 100 year old Aussie property - just like the stuff I replaced on my house a few years back and retained for exactly this purpose but decided that the time that it would take to iron out the corrugations was time I did not have so aluminium won the day.
Moon Disk Fitment
With Christmas out of the way I managed to sneak out in the garage and spend a day finishing off the window surrounds and moon disk fitment.
Christmas come early
Progress over the past week has been a little slower than I had hoped. I've still managed to get stuff done but work has been massively busy so by the time I get home I've not felt up to much. But whilst my actual progress might not have been as good as I would have liked the ordered parts have been arriving at a steady rate, its almost like Christmas has come early
Things are really cranking now
After last weekends progress and also receiving my 74mm DPR crank in the post this week I was amped to get back out into the man cave and spend a little more spanner time on the oval. The DPR crank is an awesome bit of work. It's a stock 36hp crank that is welded and offset ground to give the extra stroke. It also has counterweights added and is heat treated to stress relieve the crank after the welding process. The end result is a very affordable 74mm crank.
36hp Challenge K36 Build Progress
A short time ago I posted about changing direction with the oval and entering into the K36 class of the 36hp challenge with a blown 36hp engine. Since that time I've been carefully planning the build and collecting the necessary parts.
Plastic Fantastic
After recently going to look at a 356 coupe with the intention of buying it only to find out when I arrived at the sellers house that he had changed his mind I had a bit of a case of the 356 blues. I'd first seen this car about a year ago and passed it up. It was a RHD 'B' model missing its engine and fitted with VW front axles and gearbox, it also needed a fair amount of surgery to get it back to spec again - a perfect candidate for an outlaw build. Whilst the car was perfect at that time the price was not and so I decided to pass. Well that day had niggled at me for the past year and coupled with a change in financial circumstances I decided that I would go to buy the car only to find out that he had changed his mind. Ahh well. I guess it was not to be.
Slamfest Part 2 (step-by-step)
In my lasts blog post Slamfest Part 1 me and the Jimp had stripped down a bay beam and prepped a design for some new side plates ready to cut them out on my CNC plasma. Cutting out the plates was a slow affair as the cutting speed for the 10mm steel plate had to be set at about 300mm per minute, any faster and the quality of the cut suffered. The design was based on a 5 degree castor with the shock tower location moved upwards and backwards to allow for use of the stock shock.
Slamfest Part 1
Made a start on building a narrowed beam tonight. Plan is to build two beams - one for my bus and one for The Jimps.
A change of heart
A chance meeting has netted me with a bunch of 36 horse parts. I popped out to buy a number plate bracket for the Type 34 and ended up coming home with a bunch of 36 horse stuff. This has nudged me to change direction with my plans for speed week and look to build a 36hp power plant instead of the planned 50 horse - literally a change in heart. Having been an avid follower and support of the 36 Horsepower Challenge for a number of years its probably fitting that I enter at least once. So with a selection of 36HP parts now at my disposal it has given me a chance to take a look at whats possible with these early engines.
Speedweek 2015 here we come
It's been a while since I did anything on the Oval. It's pretty much been left abandoned in the garage and used as a bit of a storage shed. I think that this is a necessary step in any restoration project, or at least thats what it seems like as all mine end up this way at one time or other.
So after sitting for the past few years its time that the oval project was revisited once again - mostly as I've decided that I'm going to race at speed week next year.
Electric window trouble
Hi all, im a bit new to this so bare with me and be gentle.. here goes
Im in the middle of fitting electric windows to my T5 transporter which were kindly donated from a mk4 golf, so far ive managed to get each window working independently from two separate switches (one each door) but im pulling my hair out trying to fit a third switch to the drivers door to operate the passengers window, don't get me wrong im no idot but seam to be having one hell of a blonde moment and cant figure the wiring for the life of me. Heres a run down of what ive done so far...
Two relays one for up one for down
terminals 30 live out to motor for up and same on the other relay for down
DIY Cyclops light
Been getting a bit distracted by cyclops lights recently. Not that the bus is anywhere near ready for trinkets, still plenty of metalwork to do before its time to add jewellery. So completely sidetracked I decided to scratch that particular itch and have a go at making a cyclops light myself. My reasoning was that it would be good metal shaping practice, plus I had kinda figured out how to make it in my head and wanted to see if I could actually do it.
SOS! Lulabelle needs help!
So, for nearly five years the lovely Lulabelle has been trundling round the festival circuit serving tea, cake and smiles... She is in desperate need of a 1200 gearbox that is compatible with reduction gears....I've had one on order for weeks and they've just rung to say they can't get one...
Can anyone help us? She's been struggling along but I know the original is on it's last legs and probably won't last very much longer...
If you know of anyone that might have one or could source one for us it would be so much appreciated...
Nicks 57 bottomless money pit Part 2

Well its been a while since I added to this so here goes-
After getting the panel back from the blasters we continued the work,now on the rotisserie..All pre 59 or so buses use an open long shift rod that is only supported at the front by a metal spring open to the elements so I decided to change the set up to the later style enclosed shift tube so the rod is supported by 2 plastic bushes.This was a hell of a lot of work as the hole in each I beam and the front and rear tophats had to be enlarged and the rigid tube bashed in.Before the shift rod was installed for the last time I filled the rod itself with grease,this acts as a vibration dampener and gives the gear shift a more solid feel.
CNC Plasma table finished
This weekend I decided to finish off the plasma table so that I can get cracking on the supercharger kits. The plasma has been pretty much finished for the past few weeks but has been on hold waiting for some smaller nozzles. The previous tests that I carried out resulted in a lot of dross and a larger then normal kerf which I put down to the 60amp nozzle that I had fitted. I ordered some 40 amp nozzles which arrived late last week.
A nip and tuck and a bit of a nose job
With the long Easter weekend I managed to get a few extra hours in on the bus. Having already cut off the front panel and one dogleg, and made up an A-Pillar repair I decided to carry on with the front end and take a look at the dented front panel.
The front nose, like pretty much every other panel on the bus has suffered a bit of abuse and has taken a bit of a pounding. Not only is there current crash damage, but there are also some previous repairs that have rusted out and need to be repaired.
DIY A pillar repairs
Spent some time today making up the repair panels for the bottom of the passenger side A pillar. Fortunately there was enough of the original left for me to take some measurements from. The repair panels are in three sections - two sections form the a pillar itself and another makes the bracket that attaches to the inner lower nose panel.
Tinker
Managed to get out and do a bit more work on the bus today, decided to carry on sorting out the lower nose inner panel. The panel that I acquired unfortunately turned out to be for a left hand drive bus, which meant that to get it to fit I needed to swap over the mounting brackets. The reason for this is that the two chassis rails that it attaches to are not identical and so have slightly different profiles, this means that the mounting brackets are also slightly different.
DIY Cab Floors
With the cab floor on the '55 looking like it needs replacing I decided to see if I could avoid having to buy a full repair panel by using the floor from a front cut that I have stored for my 15 window project. I have the front cut to provide a dashboard and chassis member to convert the 15 to right hand drive but for some reason the cab floor is nearly perfect. Not what you would really expect on a bus that ended up getting chopped up. Unfortunately whoever chopped the floor section out did not really do a very good job, not only did they gas axe an inch off of the floor on every side, but they also managed to cut straight through the chassis member that I need for the RHD conversion. Phah.
So I decided to dig the floor section out from the back of the 15 and take a look.
And so it begins...
Those of you who know me will also know that I sell supercharger kits under the moniker 'Joe Blow'. A while back I decided that to promote the kits I would put together a logo'd rat panel van - with nice Joe Blow powered motor. Orignally I was after a lowlight panel but somehow ended up with a '55 panel instead. So today I decided to start work on eliminating the tin worm. I recently cleared a load of projects from my schedule and so figuring the bus wasn't going to fix itself I decided to get stuck in.
Fuel Starvation Issues
Since building the engine and adding the supercharger the lowlight has been pretty reliable. There were some initial gremlins to overcome such as the vastly underpowered generator, but since swapping it out for an alternator things have been fine. Fine that is until the other day.
We had just stopped off at Hungry Jacks (or Burger King as us Poms call it) to grab some well deserved mango smoothies after a day out at the beach, the bus did not want to fire straight up, which I put down to the very hot weather but I managed to get it started and drove off back to home. We managed to get about 200 yards down the road when the bus just stopped.
A little update on Gretl
So, my pan halves rocked up the other day, I was over the moon. I spent a couple of hours outside so that was great. Was cleaning up the tunnel a bit more and then I got a little carried away on the body.
Gretl the 1303s Part 1
I figured I best bring the Vdubber community up to speed with my current build.
A couple of months ago I came into the possession of Gretl. She was to be a ground up restoration and at the time of purchase, I race car on the weekends. Since then I have changed my mind.
1978 VW "Champagne Edition" Karmann Convertible
G'day everyone,
My dad and I spotted a VW bug mostly covered over on a trailer coming home from Melbourne today. The guys who were towing the bug stopped for fuel so we stopped and I had a look and had a chat to the owner. He told me it was a 1978 VW "Champagne Edition" Karmann Cabrio. It was a very, very tidy car. Here is a pic I took of the bug...
DIY Sheet Metal Clamps
It's been absolutely ages since I did anything for my VW's. I've been pretty busy developing the supercharger kits but have done nothing on any of my resto projects.
Inspired by the Peter Tommasini sheet metal forming course held in the Adelaide Hills that I recently attended I decided that it was long overdue to do something towards making progress on one of the projects. One thing that I have been doing since the course was sourcing some more tools. I've mostly already got everything that I need but am missing a good blocking hammer and a few other odds and ends. One thing that I have been meaning to make for a long time is some of these butt welding clamps.
1970 Notch (Lowered)
G'day everyone,
We finished lowering our '70 type 3 Notch yesterday. The front has been lowered 2 splines and the rear has been lowered 1 spline.
Rusty's 1970 Notch (Road Worthy'd)
It has been a great learning journey working on our 1970 Type 3 Notchback. We now have it Road Worthy ready for my dad and I to cruise around in, and also ready for when I get my Learners.
Supercharging the bus Part 3
So. Spent today fitting the engine into the bus. Had a bunch of shits and bits to fix up like fixing up my dizzy, rewiring for the alternator, fitting a new exhaust, adding the electric fuel pump, running new fuel lines, cleaning red dust from everything. In fact it took most of the day just getting everything to the stage where I could fit the engine.
Nicks 57 bottomless money pit
Hi all,as some of you know, I've been flat out doing a 57 panel patina monster for the last 18 months so I figure its time to share the highs and lows.So here goes..
The bus is a 1957 Dove Blue panel that was advertised on DSK in July 2011.It looked good,the usual rust,but for me it ticked the major box,ORIGINAL PAINT!! Turns out that the guy who was selling it had bought it from the first owner,he'd done nothing with it except drag it home so I like to think I'm the second owner or at least the second driver.
68 & 70 Type 3 Notchbacks
G'day everyone,
My family and I recently purchased two Type 3 Notchbacks, a 1968 and a 1970. They arrived by truck on the 4th of December.
Outlaw 34
If you are into Type 34 Karmann Ghia's, chances are that at some point you would have come across the name Mick Percy. If the name sounds familiar to you it's probably because you have spent some time over at Type34.com or as it's more commonly known The Type 34 Registry where Mick has been the resident webmaster for the past ten years. You might also know him from right here on VDubber.
The build of Mick's '65 Sunroof Type 34 spans some 18 years, two continents and several changes in direction.
Here's Mick to tell you a little more ...
Narrowing IRS - Part 2
If you've been following the build of the Ghia you may recall that I previously blogged about narrowing the IRS arms to help fix a tyre clearance issue that I have with the Ghia. Well having sourced another set of IRS A-arms some time back, this weekend I finally set about getting started.
Supercharging the Lowlight Part 1
One thing that really struck home on our recent interstate jaunt to ReVolks was how damn slow the bus is. I have often joked that when I toured around Europe (also in a 1600 bay window) you would have to go flat out down the hills just to be able make it up the next one. Well somehow the reality of driving a 1600 bus over very long distances had managed to become little more than anecdotal humour. This is a bit of a shame, as had I remembered how painfully slow driving a1600 bus was I might have opted to build something a little larger. After all, as our cousins in the good ole yew ess of aye say... 'there's no substitute for cubic capacity', or is there? Faced with the reality of having to build another bigger engine I opted to take the easy way out. Forced induction!
ReVolks Roadtrip
It'd been a good many years since I've camped in a bus so I'd really been looking forward to ReVolks. For the non-Aussies here ReVolks is a VW show held in Geelong in Victoria - Some 700k's away from where we are in Adelaide. The mad rush to get the lowlight finished in such a short period of time was mostly so that we could take a bit of a holiday and take in the ReVolks show at the same time.
Electrickery and other such magick
With the ReVolks trip looming and the interior in the bus it' time to get things finished off and start packing for the road trip. Everything at floor level is pretty much done, carpet is in, rock and roll seat is in, rear cargo area is carpeted, in fact the only things that havent been done are up in the roof.
Interior in
The bus has been pretty good over the past week or so, it starts up on the button and apart from a little bit of a flat spot when cold is running pretty good. I readjusted the choke by aligning the (rather small) mark on the choke element housing with the mark on the carburettor, this has made a massive difference but there is still a bit of hesitation when pulling away. This disappears when warm so I'm guessing that I've still got a little tweaking to do.
Tanks for the memories
Since getting the bus roadworthy I've spent the past week and a half cruising to work in it which has been pretty cool. It's great to have a veedub as a daily driver again and even cooler for it to be a bus. It's also given me a chance to iron out a few bugs and make a list of stuff that needs to be looked at.
One of the the things that found its way to pretty much the top of the list was a leaky fuel tank. Ironically when I was originally fitting the engine I looked at the bottom of the firewall tin and noticed that the foam seal looked a bit 'melted', I even thought to myself 'I bet that's due to a leaky fuel tank'. Well, guess what, I knew it! the darn thing leaks. Fortunately Volksfactory once again helped me out from their stash of stuff and provided me with a nice early style fuel tank (early bay tanks have a bolt in style fuel sender unit). I also picked up a few other bits and bobs as well, including a passenger window.
It'll be all white in the end
Last weekend was a bit of a milestone in the build with the bus's first trip around the block. One thing that was instantly apparent from the maiden voyage was that the accelerator linkage was absolutely cactus. The second thing that was also readily apparent, and was made a lot worse by the first thing was that PICT34's and 009's do not play nice together. The bus had the infamous flat spot, which made you want to stamp down on the loud button to get things moving. This worked (to a degree) but ended up with the worn throttle sticking in the down (flat out) position. All in all it made for interesting driving.
Rat Oval
Nick Bentley's Badass Rat Oval
Nick Bentleys 56 rat oval is a regular part of the South Australian scene and can often be spotted at events and meets. Sporting perfect patina, a big Type 4 power plant, all round disc brakes and a close ratio box not only does it look badass, it's lots of fun to drive too. Here's a bit more about the man and the rat straight from the horses mouth...
It Lives!
You might recall from my last blog Paint Your Wagon, that I ordered some parts from MoFoCo, unfortunately they were not posted out so after a bit of chasing up they were finally mailed out to me express. Well according to USPS they should have arrived no later than 5 days later, so after waiting for 6 days I decided to lodge a paypal dispute. The initial slackness on MoFoCo's part, and time limit that PayPal put on making claims pushed me past the point of trying to pussy foot around the issue. I figured that if the parts arrive - all well and good, and if they didn't, then at least I could order them form somewhere else.