Bottom End
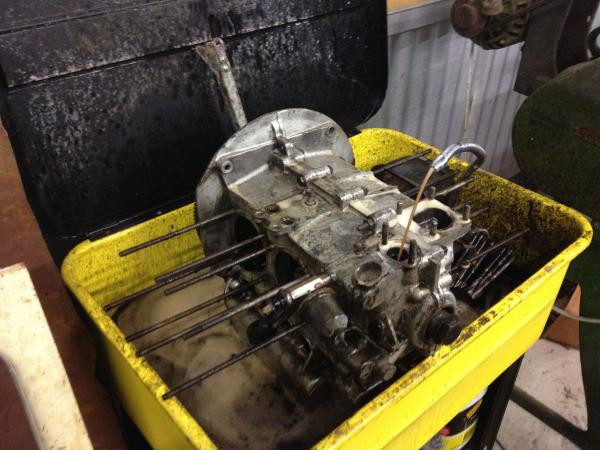
This weekend I managed to get a bit more done on the Lowlight. After rebuilding the heads last week I decided that I should really split the case and at least take a look at the bottom end to make sure that there were no gremlins in there. Whilst this will add a week or two to the build at least I will get a peice of mind until I get around to building a 2150 for it.

The engine oil in the case was pretty thick so I left the complete short block in the parts washer to clean out the gunk. I then gave it a wash down with the pressure washer before mounting case on the engine stand. With the case split I measured up the crank and took a look at the bearing surfaces. The crank looks to be +0.25 oversize which marries with my impression that the engine has been rebuilt at some point.

Unfortunately the crank has some witness marks on it which look like they have been caused by dirty oil which is a shame as the journals are not too worn and show no signs of ovality. It might be possible to polish the journals but will have to check the tolerances. Hopefully I can get away with repolishing the journals and fitting a new set of bearings.
With the case split I decided that I would tap the case for a full flow oil system. This allows the fitting of an external oil filter which is obviously a great bonus for engine longegevity. At this stage I do not intend to fit an external oil cooler. As I am not increasing the power of the engine there should be no additional heat generated, however, it would be a simple matter to do so later on.

To convert a case for full flow requires that the case is drilled and tapped. Whilst it is possible to do this with the engine assembled it is really something that should be done with the engine stripped. The conversion involves plugging up the outlet port on the oil pump, plugging up the oil gallery that leads from the oil pump, fitting a full flow oil pump cover and opening up the end of the main oil gallery so that it can be drilled and tapped for a return fitting.

With this type of modification the oil is diverted out of the pump cover, through whatever external oil filters / coolers you have fitted and then returns back into the case on the downstream side of the plugs you added. The reason for fitting plugs to both the pump and case is to prevent any possibility of leak-by as this can result in a loss of oil pressure, especially at higher temperatures when using a multigrade oil suich as a synthetic. Unfortunately plugging of the oil gallery that leads from the oil pump is not possible without splitting the case.

With the case tapped the engine is ready to be reassembled, however I need to linish the crank journals and re-mic the journals to check the size still falls within tolerances. One I am happy I can then order a new set of bearings and put everything back together. To linish the crank I need to get it set up on the lathe and make a linishing bow, but more of this later.
As I am stuck until I can get the time to linish the crank I decided to take a look at the bumpers. The front bumper had already been replainted black and looked to be fairly straight. As I want to return the bus to it's original paint scheme I decided that the front and rear bumper and the wheels need to be repainted the original Antartic White colour.

I had already sourced some new step rubbers for the front bumper so I cut the old brittle rubbers off. This unconvered a little rust under the rubbers that had made some pin holes through the steel in a few places. I decided that rather than weld in some repair patches I would cure the rust and deal with the repairs when I repaint the bus (some time down the track), fortunately the rust was not too bad and will not be visible when the rubbers are fitted. The bumper had a few dings that I panel beat out but will require a thin skim of filler to make completely straight. I also straightened one of the mounting irons as this looked like it had been bent up when it was removed. With the bumper rubbed back I gave it a coat of primer ready for a guide coat and a little filling.

I also started to remove the paint from the wheels and rear bumper. The rear bumper is also in really great condition with only one small ding in it. Fortunately the splash pans are also still present and are not bent or rusty. I'm working towards getting all of the parts that need painting prepped and ready for paint so that I can paint them all together. Once the bumpers and wheels are prepped all I need to do is the front doors. Hopefully this weekend.


One unfortunate thing was that the tinwear for the bulkhead that I sourced was the wrong type. The tin is for a 1600 but not for a lowlight. This means that I am still after the correct item. If you can help me out please shoot me a message. The first photo above shows the new (incorrect) tin, the next photo shows stock bug tin and the final photo shows the two together. If push comes to shove I will simply fit the bug tin whist I look for the correct part.


Comments