Steering me in
This weekend I turned my attention to getting the rest of the brakes installed. The pedal assembly needed to be fitted and the SACO hydraulic clutch kit installed. The SACO kit replaces the clutch cable with a hydraulic setup which includes a small master cylinder that locates inside of the 'transmission' tunnel, and a slave cylinder that mounts where the stock clutch cable normally mounts.
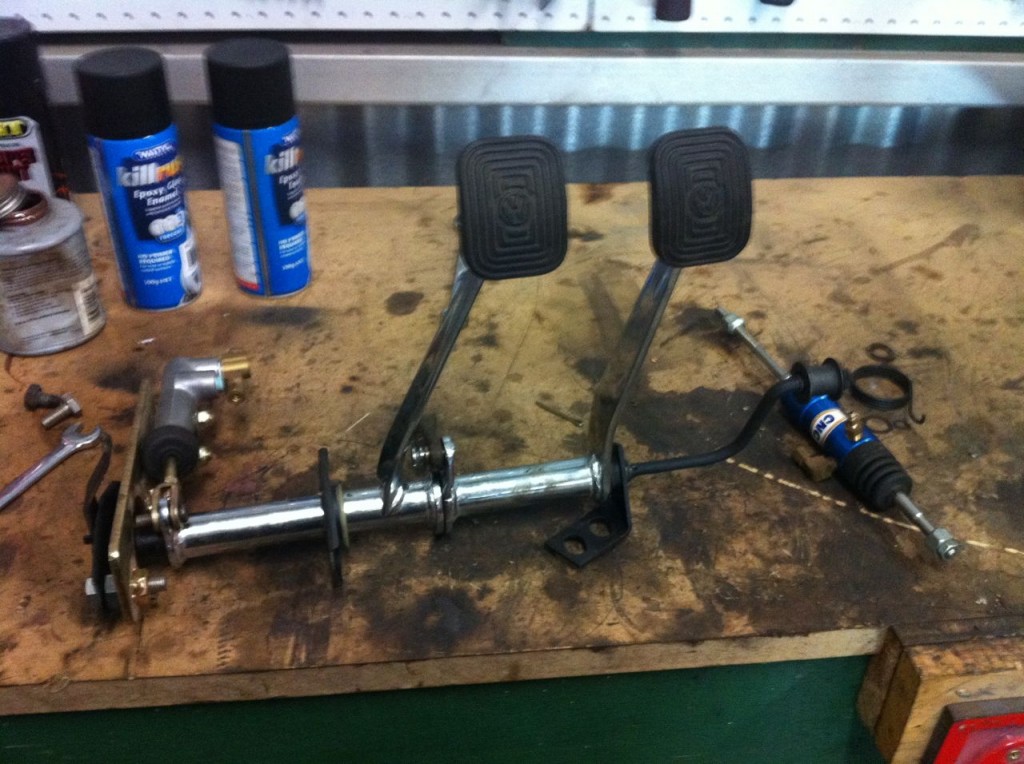
The first thing to do was to locate all of the separate parts of the pedal assembly so that I could trial fit everything together on the bench. I had previously completely removed and disassembled the pedal assembly as I had the pedal arms chromed.

After rounding up all of the parts I set about refitting the pedal assembly together. The were some components that were still a bit dirty as they had not been cleaned up, so I degreased them and repainted them where necessary. I then reassembled everything to check that the pedals still moved freely and that there was no binding or stiffness - something which may have happened as a result of the chroming process. There was a little stiffness, which I managed to eliminate with some more judicial cleaning and fortunately everything then worked as expected.

Next up was test fitting the hydraulic master cylinder. This sits on the inside of the tunnel and affixes in position through the same bolt holes that hold the pedal assembly in place. To do this the existing captive nuts need to be drilled out, so I wanted to make 100% sure that the setup was going to work before drilling out the threads.

The cylinder is activated by the standard clutch pedal arm. The hook that normally pulls the cable instead pushes the cylinder. The cylinder rod is held to the clutch arm with a clevis pin. The whole assembly is a little fiddly to assemble - even on the bench. Assembling it in the car will certainly be a challenge.
The other part that needed to be fitted is the master cylinder. To drive the larger callipers I'm using a 944 turbo master cylinder, this is a dual circuit master cylinder that locates in the standard VW mounting without any modification. Or so I thought...

My test fit of the master cylinder (some years ago) did not reveal that it actually clashes with the steering arm when on full lock. This is because I must have test fitted it with the front beam removed. After pondering the situation for some time, and trying various different fluid reserviors it was looking like that only solution was to convert to a rack and pinion - a project that I did not want to have to do at this time.
 Dual circuit bus reservior
 Bus reservoir fitted backwards
I then remembered that you can get 'bump steer' kits for lowered beetles that flip the ball joints upside down, reducing the tie rod angle and thus reducing bump steer effect.
I removed the ball joint and did a few tests and determined that this would work and even provide enough clearance to be able to fit the 944 brake fluid reservoir. I also determined that flipping the ball joint over would also have a minimal effect on steering geometry due to the length of the arm, this however would not be the case for the shorter arm, so this will get left as it currently is. So I ordered a set of bump steer bushes and will await their arrival.

Steering arm with ball joint flipped (stock VW remote reservoir fitting installed)
I also received some badge clips that I had ordered so decided to fit the badges. I bought the side marker badges some time back and intended to get them refinished as they are a coppery finish, but I kinda dig the look - they (nearly) match the gold plated Karmann Ghia script that I have on the decklid.
I had the script gold plated as one of the inspirations for my car was the outlaw 356 built by Gary Emory. The colour is an original Porsche 356 colour 'silbergrau' and the gold badges are reminiscent of the speedster badges fitted to the side of speedsters.
I also dug out the NOS 'TS' badge and pondered fitting it. Originally I did not want to fit it as I liked the clean badge-less look at the rear, but now I'm a little undecided.
 Canadian side marker badges.

NOS 'The Samba' Badge.

TS Badge fitting instructions

NOS TS Badge
I think I will fit the TS badge, but will get it refinished in gold to match the other badges. I think it looks good against the silbergrau paint (of course I concede that this is not to everyones taste). However, the hardest thing is determining where to drill the holes, as the instructions do not refer to the Type 34, only the Type 3 models. But at least I have some photos as a reference...
Comments