Front Beam Refitted
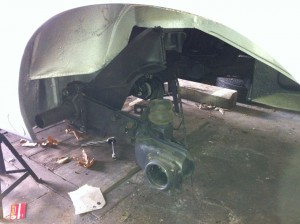
I’ve made some good progress on the Ghia the past couple of weeks. After assembling the IRS last weekend, I stripped and painted the front beam. The front beam was already partially stripped having been removed from the car some time ago. I had previously prepped and painted the steering box and had already removed the hub assemblies too.
I spent some time removing the old road grime and grease from the beam, and stripping off the old paint. The beam ideally needed to be completely stripped down and media blasted, but as I’m on a schedule to get the car finished before September I opted to skip this and prep the beam manually instead. So I stripped the beam and give it a couple of coats of etch primer and enamel topcoat.
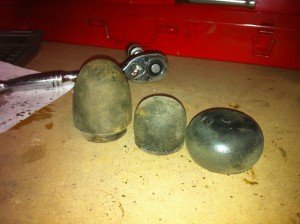
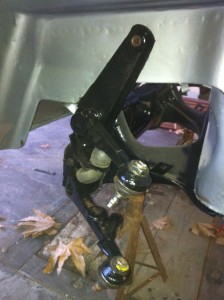
Next I fitted new top and bottom ball joints, and refitted the bump stops. A great tip here is to use the top of the rear bump stop you cut off when lowering the rear suspension as the lower bump stop. Normally the prescribed method when lowering the front of the car involves swapping the top and bottom bump stops (they are different heights) this gives the extra travel needed to prevent the suspension ‘bottoming out’. But using the top of the rear bump stop gives you a bit extra travel as it’s a tad shorter than the front bump stop, which is great for really lowered cars.
So with the front beam repainted, this weekend I set about refitting both the front and rear suspension into the car. Surprisingly I managed to find the rubbers and brackets that hold the front beam in place. I stripped and painted the brackets and gave the rubbers a bit of a clean up using a wire brush to get the really bad grime off and then soapy water and a scrubbing brush to clean the rest up.
With the brackets painted I turned to the fixings. I’ve been using an acid solution to chemically blacken the old bolts, washers and brackets. I’ve been opting to replace bolts with stainless versions where possible, but some bolts, such as those use throughout the suspension and brakes are made from a higher tensile steel to cope with the higher stresses. In these situations there is no option other than to use the original style and type of bolt. The blackening process is commonly used in manufacturing processes to prevent corrosion in steel parts, and is commonly found on high tensile bolts.
With the fixings sorted out it was time to get the suspension back in the car. I started with the rear by jacking up the beam on a trolly jack, fitting the rear is a pretty simple job, even on your own. By jacking up the beam from the centre, it’s possible to align the front mounting. Once this is in place, continue jacking the beam into position, watching the clearance at the torsion tube ends as it gets very tight agains the inside of the bodywork. With the beam snugly aligned, I refitted the mounting hardware, including the cover plate underneath.
The rear suspension still needs to have the hubs fitted but at the moment I am waiting to place an order with MBT. I received a response to my enquiry and was told that they have about a 6 week turnaround for the conversion parts. The kit contains a custom backing plate, custom hub centres and other parts needed to run the 944 turbo /996 rear brakes on the stock VW IRS arm whilst still utilising the stock VW park brake cable. It’s not cheap, but at least I already have the callipers along with new discs, shoes and pads.
With the rear suspension refitted, I moved on to fitting the front beam. This is a little more tricky to do on your own and requires a little more care as there is no easy way to align the beam. The best method I have found is to slide the beam into position from the side of the car, and then raise it up on two pieces of wood – one at each end. The aim is to get it as high as possible, but at a minimum at least high enough to get a jack underneath the centre. Next slowly raise the beam whilst steadying it from under the hood – you will need to remove the fuel tank to get access. Once the beam is in position, fit the retaining plates to hold it up. Obviously this is much easier to do with two people, where you can simply lift it into position from each side of the car. A tip here is to tape some cardboard over the beam towers to prevent them scratching the paint whilst you are fitting the beam.
With the front beam in place I decided to refit the steering box. I previously painted this when I originally stripped down the beam. The steering box needs topping up with oil, I will have to check what type is required. Next up I need to strip and paint the steering arms and fit new ball joints. I also need to paint the vertical links and refinish the callipers as they are looking a little shabby.
Along with finishing off the suspension and brakes I also need to trial fit the engine and gearbox that I bought as I have to fabricate some engine mounts. The idea is to try and replicate the standard IRS mounts. Fortunately I managed to get some photos of some stock mounts from Daniel Baums old automatic which is a good job as IRS Type 34′s are a pretty rare beast, and not something that are available to photograph every day. Hopefully they should be fairly straight forward to make now I have the sheet metal bender.
In preparation for trial fitting the engine I will partially strip it down to remove excess weight. I will strip it down to a short block and also prep and paint the tinware ready for the new engine build. At the moment I am undecided whether to machine the existing case myself, or buy a ready machined case, but I have a feeling that time might dictate that one.


Comments 3
coming along nicely mate, soon be able to start on my splitty for me
coming along nicely mate, soon be able to start on my splitty for me ;)
Yes,, making some good progress. Very tempted to do some work on the bus as I keep having to walk past it, but I must be strong and not give in to temptation.
Yes,, making some good progress. Very tempted to do some work on the bus as I keep having to walk past it, but I must be strong and not give in to temptation. :D
one at a time mate
one at a time mate