915 clutch pull to push

915 clutch pull to push

If you read my last post - 'Hydraulic clutch slave' which was about fitting a hydraulic clutch to a Porsche 915 gearbox you might have thought that it was a good solution to an otherwise difficult issue to solve. Well that is what I thought until I tried to fit everything together. What I actually found was that the slave cylinder that I used was too long and meant that it fouled on the clutch assembly when the engine was installed in the gearbox. With limited time to buy and fit another shorter unit I decided to look at converting the old pull style 915 clutch release to a traditional push style.

  5237 Hits

Sebring Exhaust Part 2

Sebring Exhaust

If you read my previous post Sebring Exhaust Part 1 you would know that I have decided to build my own Sebring style exhaust. 

This evening I managed to get a little time to make a start on it.

  1987 Hits

Mail Call

IMG_0176 Side Screens
Picked up these pre-loved side screens from thesamba. Big thanks to Patrick Brown for the heads up on these. Loving the aged look of these. Very reasonably priced too.

I believe that these might be a period aftermarket accessory. I've seen a couple of sets fitted to original cars. They are formed from aluminium extrusions and welded together and generally nicely finished. 
  2132 Hits

Carrera style fuel tank - Part 1

IMG_0252

Just a quick update. Not much has been happening on the project as I've been tied up with work. But I did manage to grab a quick 5 minutes today to make a start on the fuel tank...


  1849 Hits

Door Capping

Door Capping

I've long wanted to make some original style steel door cappings for my speedster. Whilst repros can be purchased they seem to be almost as expensive as my car. Karmann Konnection in the UK have some listed at AU$1k for the pair. Far too rich for my taste.

So I decided to make a small test and build a prototype to see if I could figure out the best techniques for making them. 

  1554 Hits

Door Capping - Part Deux

Door Capping

After a successful trial making a steel door garnish, I decided to have a go at making the complete thing.

  1413 Hits

The missing link

Missing Link?

Some of you may know that I'm trying to make my car look like a 'missing-link' car, something that might have come between the Pre-A cabs and the Speedster. Whilst the Max Hoffman commissioned America Roadster (shown below) is the actual link between these cars, it has very different body lines to either the orignal convertibles or the Speedsters and to me seems very out of place in the family tree. There are actually a few cars out there that fit in with this genealogy much better than the America Roadster; Take a Pre-A cabriolet and fit a low style windscreen or aero shields instead of the original and you have a very convincing missing-link car, a car that fits in much better than the America Roadster.


  1489 Hits

Mail call

Pre-A Light

Received some more goodies in the post.

Early style rear lights and a red lense for my shine down light so that I can use it is a third brake light

  1043 Hits

Mail Call

IMG_20210119_135705

It's been an exciting week for deliveries. Got another parcel today. Can you guess what it is?

  1220 Hits

SCCSA Grille Badge

SCCA Badge

It seems to be a tradition amongst replica 356 owners to have a period grille badge. Not being a fan of fake Outlaw 356 or Cliche'd Nurburgring badges I've been on the lookout for something more suitable.


  1328 Hits

Aluminium Badges

Aluminium Badges

Building an early replica has been a bit of a challenge in some areas. The Late 50's cars have a pretty good availability for trim and parts as most parts are now remanufactured. The early cars however have a number of differences from those late parts which means that in many cases, to be correct the late parts cannot be used. One such case is the Porsche scripts.

  1458 Hits

Sebring Exhaust Part 1

IMG_20210212_175029

A Sebring style exhaust is something that I have been planning for a long while. Whilst it's not the best style of header to use from a performance perspective, it does have that iconic Porsche racing style to it and so is the perfect choice for a period looking car.

  2080 Hits

Mail Call - Brake Discs

IMG_20210215_104347

Got some more goodies today, my new front brake discs. These took a while to source as everyone has been out of stock since before Xmas.

  996 Hits

DIY Pre-A Handbrake - Part 2

IMG_0040

In this episode I assemble the parts and drink some coffee.

Well, that's more-or-less what happened...

  2090 Hits

Glaser Karosserie

Karosserie Glaser Badge

Many 356 fans will know of the name Reuter, the coach builder responsible for the manufacture of the Porsche 356 from 1950 onwards, but many do not realise that initially Reuter did not have the capacity to build the convertible models so this task was awarded to Glaser, the renowned East German coach builder.

  2389 Hits

Sebring Exhaust Part 3

Sebring Exhaust

Managed to scrounge a few minutes to finish off the collector for the Sebring exhaust tonight. I had ran out of gas when I was initially welding up the collector and so still had to join the two halves together. Today I managed to get a few minutes to finish them. I spent a little time tidying up the insides so that the two halves were symmetrical and then welded the two halves together to finish off the collector. I also trimmed down the uneven ends so that everything is ready for the next stage.


  1721 Hits

Silencer End Pressings

IMG_20210313_181404

After completing the collector for my DIY Sebring exhaust the next part that I need to tackle is making the silencers. I have already spent a bit of time doing some research to try and find some off-the-shelf items but due to the small size needed I could not find anything available that could be used without having to modify it. This means that the only option left is to make them myself.

  1570 Hits

Okrasa 1625cc

Okrasa

Been a bit flat out with work so no real time to do anything on the build but have been doing a bit of daydreaming whilst standing at the lathe. I've somehow convinced myself that I should put together my Okrasa engine for the Speedster.


  2599 Hits

Fram Bypass Filter

IMG_20210412_170029

For an authentic looking engine bay a Fram or Mann style bypass oil filter is a good nod to the original 356 engines and will definitely help give your engine bay that vintage Porsche look. Bypass filters are often dismissed as old hat and inferior to full flow style filters, but is that actually the case? 

  1816 Hits

356 Oil Filler / Breather

IMG_20210414_153104

Another piece in the puzzle arrived today. Todays treasure is a 356 oil filler neck.


  1777 Hits

O/T Crank Pulley

s-l1600-10

Keeping with my vintage speed 356 inspired Okrasa engine build I bought a nice O/T crank pulley. These four hole items are found on early 356's.


  1762 Hits

It's inside

IMG_20211224_132759

Been a while since anything has happened on the speedster. Not that there is anything to really report, but I did manage to tick off a couple of small jobs recently

  818 Hits

Beehives

Beehive

I finally pulled the trigger on a set of beehives. I've long wanted to replace the not-quite-correct Lucas style 'beehives' with the correct style units and could resist no more when I saw these for sale.


  857 Hits

Stacks and filters

Knech Style Filter

One of those things that immediately grabs your attention when you open the engine bay on a 356 are the air filters. The original Pre-A's used dual single Solex carburettors moving on to the two barrel P40 Solex carburettors for the later 1600's and both setups used Knecht air filters which are visually distinctive in both cases both having the raised pressed Knecht logo on the top of the filters.


  1258 Hits

My DIY Pre-A handbrake

IMG_0025
Got the handbrake parts back from the water jet cutters today. They need a bit of revision but look like they will work (always a win for a prototype). 

First blush, material is too thick, also main body is a bit too substantial (may change this to aluminium). The entire assembly looks a bit cumbersome, but then the originals are a bit like that too. The trigger was actually supposed to be thinner gauge than the rest of the parts as it needs to be pressed into shape., unfortunately it's not going to be easy to bend into shape without a bit of heat. (oops) I stuffed up and forgot to spec that on the drawing. (D'oh!). 

Of course these things rarely work out perfect first go around so no real biggie. I think that it will work fine as it is, but is probably just a bit TOO big. Really need to get it made up and on the car to check that the functionality is going to work out okay, but from what I've seen so far, I'm not expecting any major issues.


  1724 Hits

914 Gauges

IMG_1118

I found a cheap set of early 914 gauges on Ebay that were simply too cheap to pass up. The plan is to give them a bit of an overhaul and update the faces to match the original 356 style. The tacho on the 914 is slightly larger than the other gauges whereas on the 356 they are all the same size. Having seen 914 gauges fitted to other 356's it doesn't really notice too much. North Hollywood Speedos can convert these to look like 356 gauges but at some around AU$1k it would be cheaper to buy some reproduction gauges. The thing that has really turned me off of getting repro gauges is that the trip meter and odometer is a nastly little LCD screen. Yuk.

  2229 Hits

Gauge face design

356-Tacho

Started to draft up the images for the replacement gauge fronts, so far I have managed to get the tacho done. The process basically involves scanning the original face to get a basic image showing the locations of the markers. Then drafting a new image using the old markers as a point of reference. I've matched the font to one very similar to the original 356 A gauge font and also take a grab of the colours. The end result is an image that looks very similar to the original style gauge but with the correct scaling for the 914 gauge. The centre tacho in the image is the new version, the outer two images are early and late style facias.

  2352 Hits

Flip-top filler cap

img-1206_large

Finished off the gauge faces today, now I just need to print them up and try them out. Also received a 550 style flip top filler cap in the post courtesy of Ebay. Need to make up a new filler neck for the tank and cut a hole in the bonnet to fit this. For some reason, whilst my tank has been converted to a central filler location it does not stand upright (see photos above) not a massive drama to sort and will give me a chance to make up a proper rain tray. The cap is made from aluminium so will polish up alright but to tell the truth I'm kinda digging the patina on it. 

  1621 Hits

Combo Gauge Update

unknown-9-jpeg_large

A little more progress, removed the red screen from the kombo gauge to install the 911 temp gauge. The gauge pod and temp insert are a direct swap, the only real difference is that on the 914 the gauges are arrange on top and bottom whereas on the 911 they are side by side. The 356 shares the top / bottom orientation and has similar warning light locations so I will use the 914 pod and fascia. One interesting thing that I noticed when I removed the gauge was that hidden behind the fascia at the very top of the gauge face there are numerical temperature graduations. evidently 150 is regarded as too hot (the beginning of the red zone). The 911 style white bars will be replaced with the early style 356 green numerical style when I redo the faces. 

  1491 Hits

DIY Gauge Bezels

IMG_1286

Made a start on the gauge faces today. I tuned down some bezels for the centre of the gauges. The bezels are to make the 914 gauges look more like the original 356 style of gauges. I made them out of aluminium stock which will polish up nice and easily. I spent a bit of time and cut out the individual odometer and trip counter holes on the speedo bezel. I also stripped and painted the gauge faces. Once the paint has had a chance to dry I will sand back the paint from the rim of the bezels and give it a bit of a polish. 

  1906 Hits

Gauge bezels finished

IMG_129_20190606-130844_1

Sanded the faces back last night and offered them up. Pretty stoked with how they are looking so far. Just need to scale the decals and print them out. Not too sure how the green will look over the black face. Guess I will soon find out.

  1594 Hits

Gauges Finished (Kinda)

IMG_1316

Finished off the gauges this evening. Scaled the fascias down to fit and printed out a few test prints. I initially tried to print onto transparent water decal paper but found that the ink was not vibrant enough and did not show up that great on the black background. This was a shame as the transparent decal paper works a lot better then the white.

So unfortunately I was forced to use the white paper so that the green numerals were visible. This had one unfortunate side effect - that the white edge of the paper was clearly visible in a few areas against the black background.


  1808 Hits

Hood frame has finally arrived

IMG_1362

After a four month wait my hood frame, windscreen frame, side screens and hood cover has finally arrived. Happy days. Now I just need to figure out how it mounts in the car. Looking forwards to getting the hood frame installed so that I can make the car weatherproof. 

  1560 Hits

Umbrella Handbrake

6292134_large

One thing that I dislike about the VW based speedster kits is that they all have the handbrake in-between the seats, rather than under the dashboard like the originals, which is an obvious giveaway on its provenance. So this has always been on my list of things to change with my kit. Of course it will only fool the casual observer but it's these small details that set some projects aside from others.

  3832 Hits

Bosch Symmetrical Headlight Lense

IMG_7571

Managed to trade for an second early style Bosch symmetrical headlight lense. I already had one of these but was missing it's partner.

Now I have two. :)

I'll swap the slightly later hella ones I have on there now out for these period correct ones.

  2575 Hits

DIY Speedster Steering Column Clamp

DIY Speedster Steering Column Clamp DIY Speedster Steering Column Clamp
Haven't done anything on the speedster for a while so was happy to grab a few hours today. I decided to take a look at the steering column with a view of getting the new column installed and mounted up. There's a few jobs to do before I can swap out the late column that's currently fitted. I managed to source an early beetle outer column tube from a mate but needed to figure out how to get it to work with what I had and how I wanted it to look following my overall plan of trying to make it look like an early car. Ideally I would love to swap the dash for a pre-A dash but my plan is simply to use as many early styling cues as I can whilst still working with what I have
  2687 Hits

Rawhide

Pre-loved leather interior Pre-loved leather interior

Rollin, rollin, rollin...

I had a bit of a brainwave. I've pretty much decided that the car is going to be finished in a faux-patina and hopefully emulating an original survivor speedster / race car / outlaw. I may paint it properly later, but for the time being it's going to be the quickest way to get it presentable(ish) and on the road.

  1692 Hits

800W electric heater

s-l1600
Bought one of these heater units for the demisters. It's pretty compact and chucks out a fair bit of heat. Probably enough to keep the cabin warm on cold days. Was pretty cheap too. Perfect if you need to have working demisters like here in Aus.
  1646 Hits

Horn Push Badge

3 Spoked Steering Wheel 3 Spoked Steering Wheel

A while back I bought this awesome three spoked steering wheel from Ned Faux. It's much like a barndoor or early split bug wheel but not actually a VW item so unfortunately doesn't fit a VW steering column. But as I'd been looking for a barndoor or country buggy steering wheel for a while and figured that it was too good a price to turn down, so somehow I would make it fit. Plus it has an awesome patina to it, which will look just right in the speedster.

  2058 Hits

Horn Push Finished

Horn Push Horn Push

I finally got around to finishing off my horn push project.

  1873 Hits

Wiring Loom

IMG_9701
Had a spare 5 mins today so decided to take a look at the wiring loom on the Speedster project to try and figure out what I have and what's needed. I wasn't really sure what came with the car except that there was a carrier bag with what looked like a wiring loom in it.
  1840 Hits

Steering column bush

IMG_9788

Not too much progress to report. Although I did make a steering column bush for the hybrid steering column setup I'm building.
I'm not 100% sold on the black nylon, however the white was simply too white and new looking. I figured black would look a little more like bakelite.
Now all I need to do is cut and shut the crash can and hook the column up

  1455 Hits

Making my steering column fit.

IMG_9963

The great thing about non-standard parts is that somehow you need to make them fit. 

You will recall in previous posts that I've been chipping away at making the steering wheel fit. First making it fit the column, then making the column support, then making a nice fancy horn push and now the ultimate culmination of the steering wheel saga making the steering column fit the car.

  2400 Hits

Plastic Fantastic

Plastic Fantastic

After recently going to look at a 356 coupe with the intention of buying it only to find out when I arrived at the sellers house that he had changed his mind I had a bit of a case of the 356 blues. I'd first seen this car about a year ago and passed it up. It was a RHD 'B' model missing its engine and fitted with VW front axles and gearbox, it also needed a fair amount of surgery to get it back to spec again - a perfect candidate for an outlaw build. Whilst the car was perfect at that time the price was not and so I decided to pass. Well that day had niggled at me for the past year and coupled with a change in financial circumstances I decided that I would go to buy the car only to find out that he had changed his mind. Ahh well. I guess it was not to be.

  3555 Hits

Slow Progress

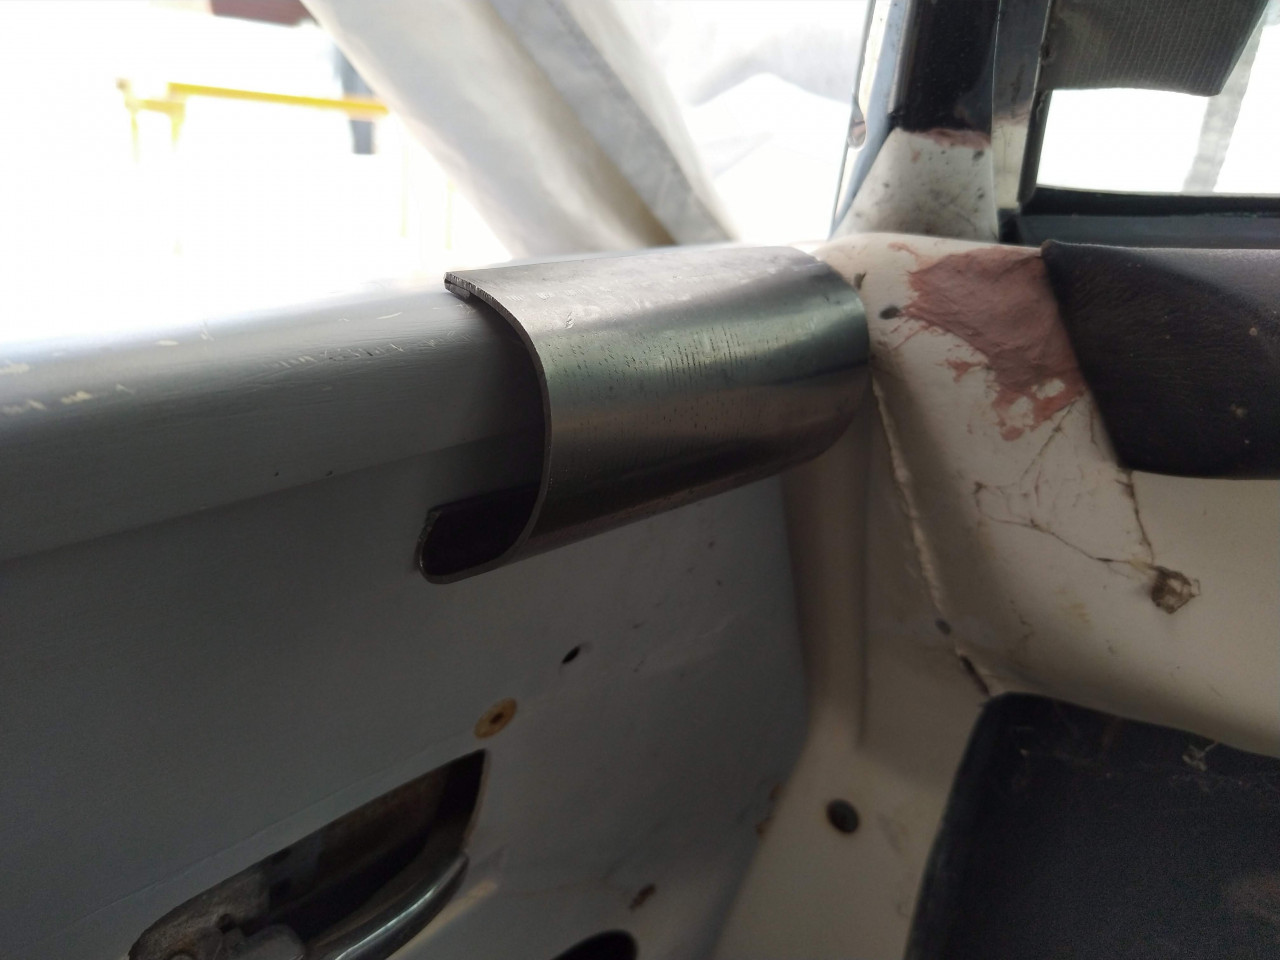
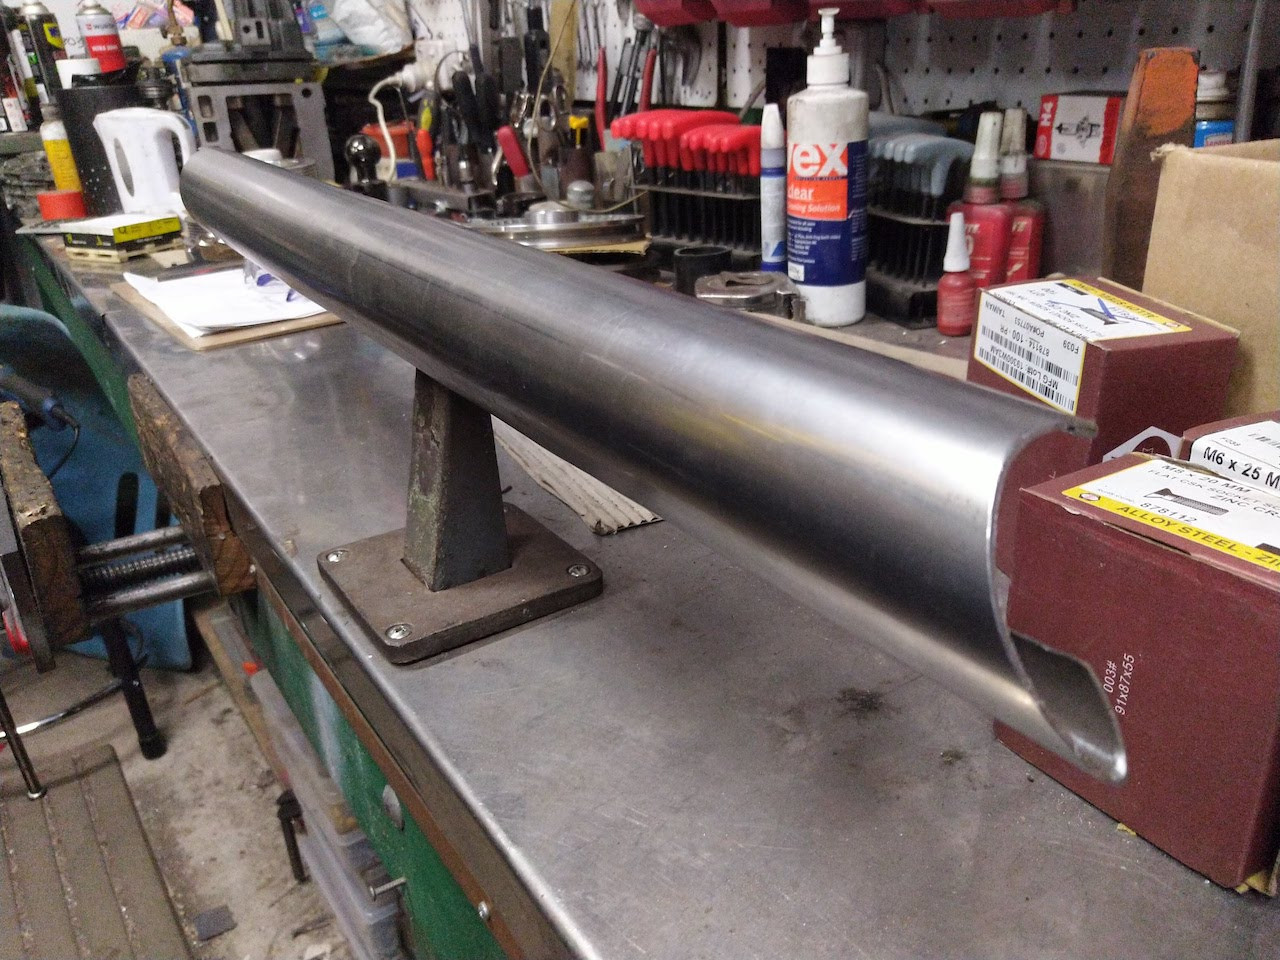
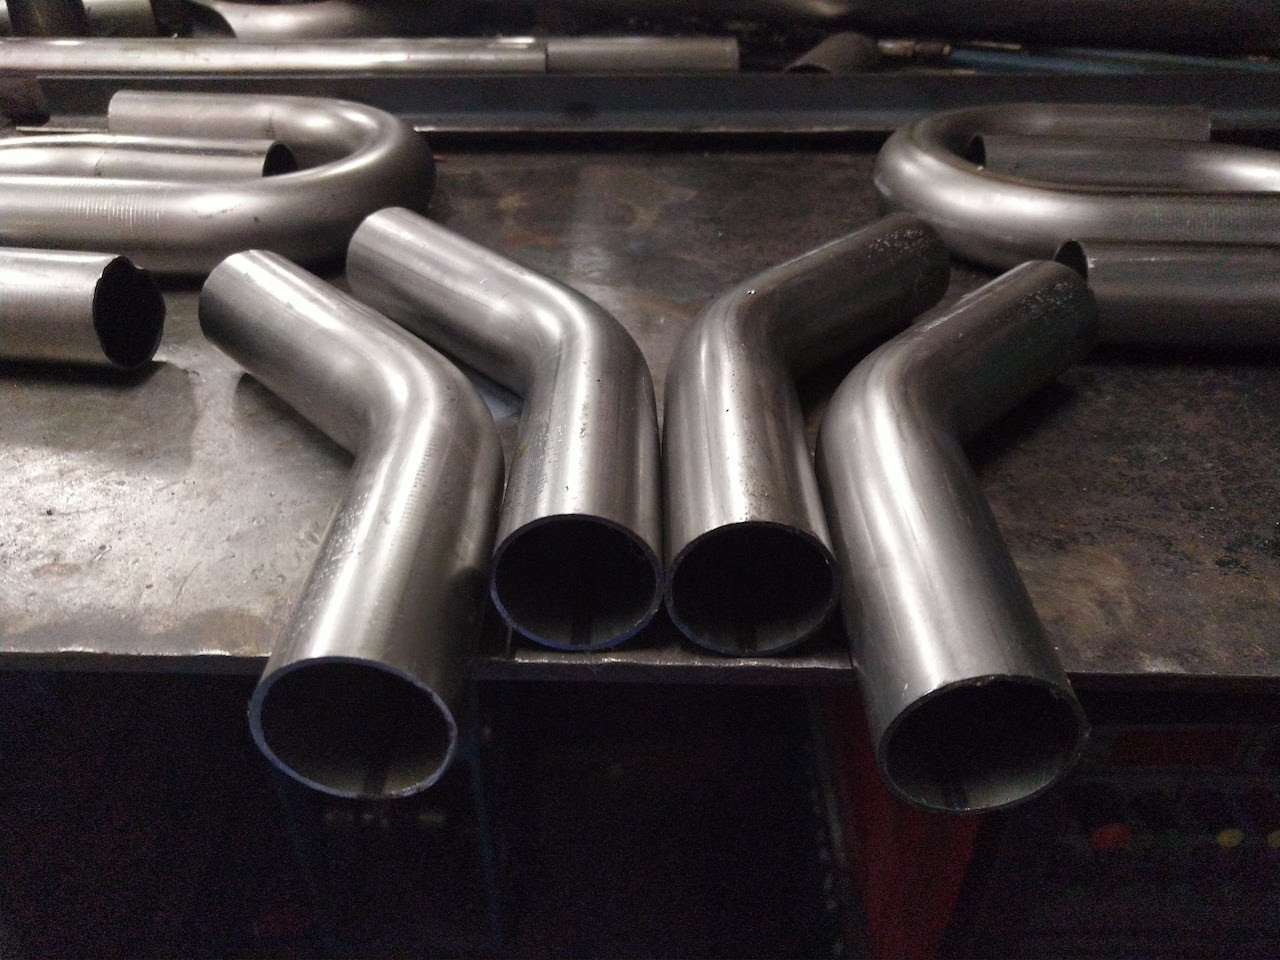
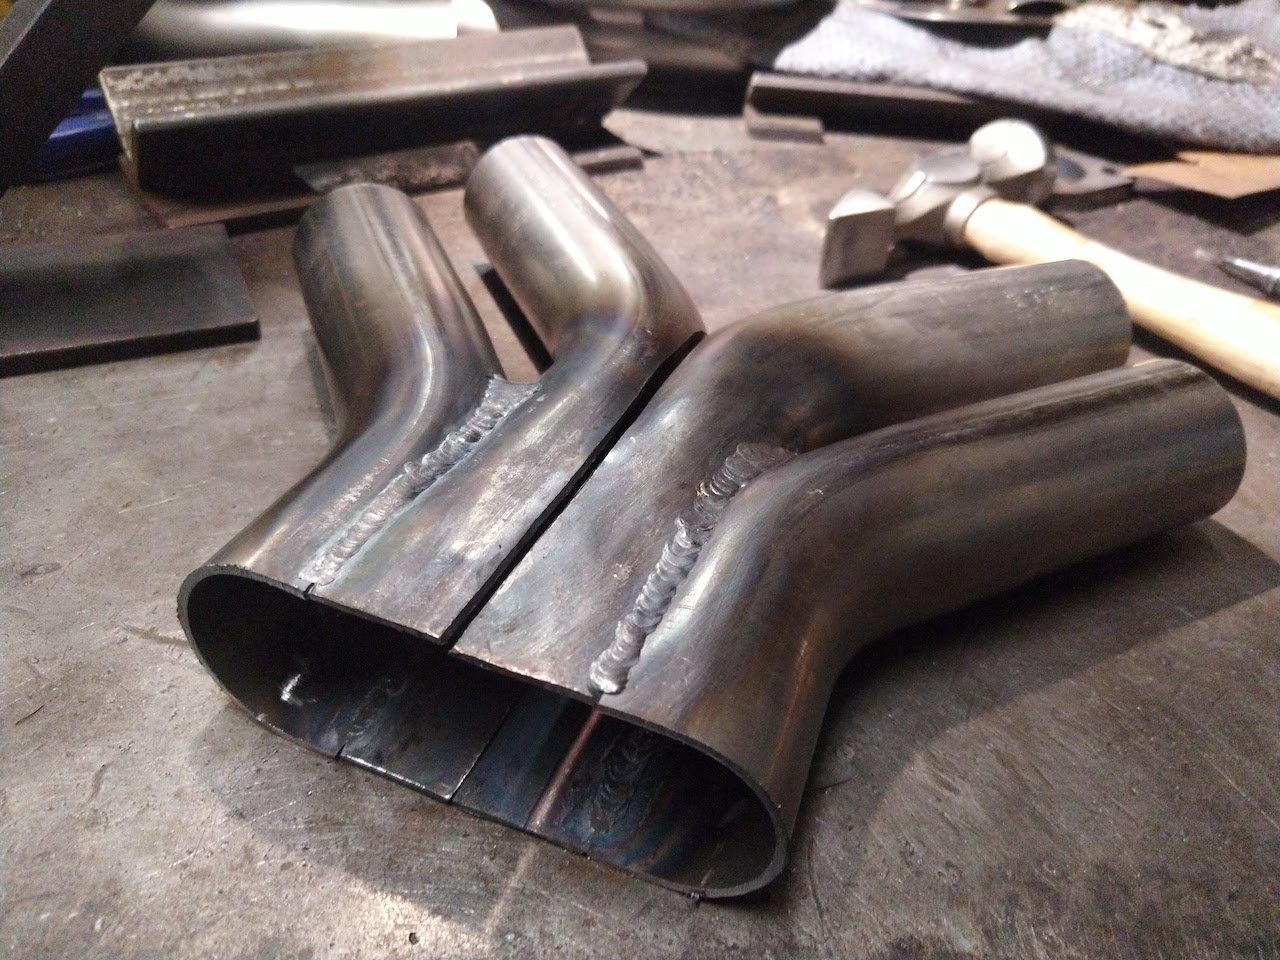
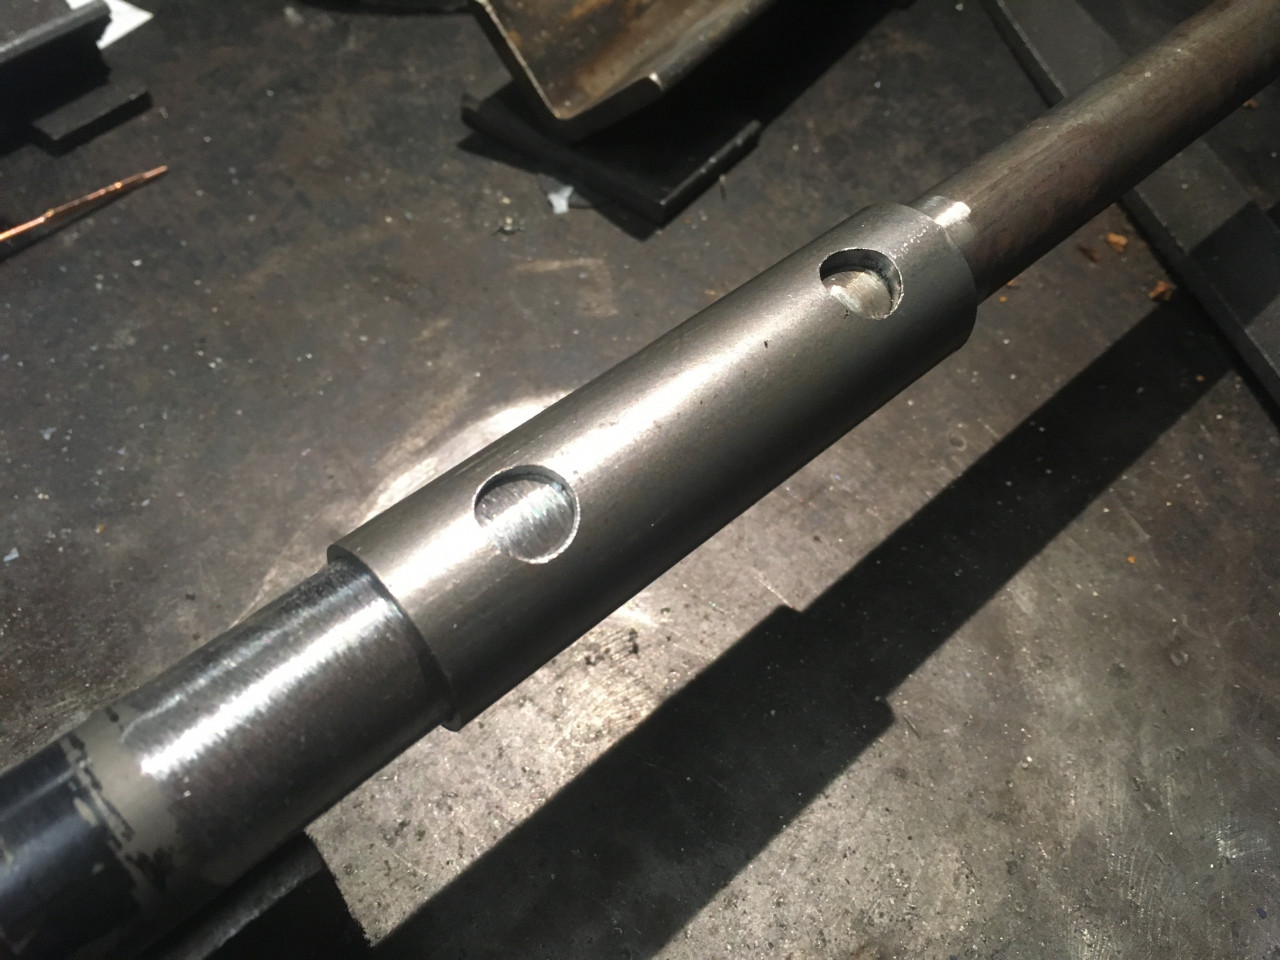
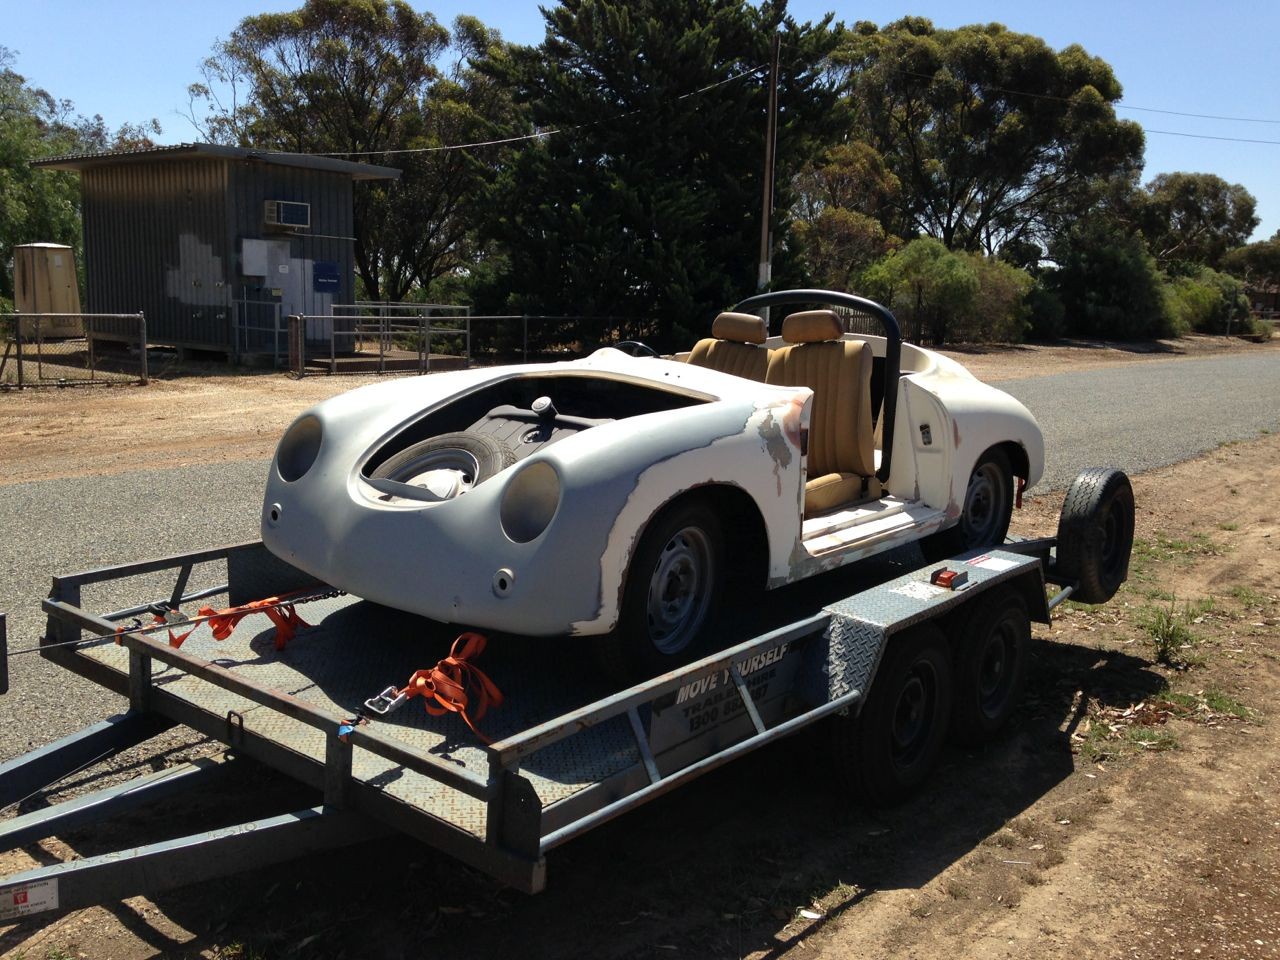
Wow Looking at the date below, it's been some time since I've been to this page. So I guess in two years a lot must have been done (yeah right). I've managed to source some more bits, these include a NOS type 4 engine case, a Porsche 915 gearbox (from an '83 911 SC), a tacho, an IRS rear end and some other bits and bobs. The remainder of the chroming has been taken to the chromer's, all that remains is some catches and other bits that are to be zinc plated. I've started to strip out the remainder of the shell in readiness for it's trip to the painters (I've decided to entrust this to the professionals, plus I never seem to get the time). The boys from Paintbox have been round and had a look, and say that the roof shouldn't be a problem (they're experts at roof chops on bugs) so I need to get it ready for when they can fit it in, which should hopefully be sometime late August. This involves removing everything that's left on the car, and doing a bit of tinwork (I have to fabricate some engine mounting points, as the original top style mount will have to be removed, and a bus style (or later type 3 style) cross-member needs to be fabricated. to do this successfully the engine and gearbox needs to be trial fitted, (this will also allow me to weld the mounts for the Porsche gearbox cross-member as well).

The gearbox needs an overhaul as the synchro-mesh on first gear is shot, I have the parts to do both first and second synchro's and have been informed that it's a relatively easy job. This however is not the first job on the list, that job is to clear out the garage, which has been neglected for quite some time, as I need to create enough space to work on the Ghia (plus Karens Ghia is due back from the painters soon). So come tomorrow that's what I'll be doing.

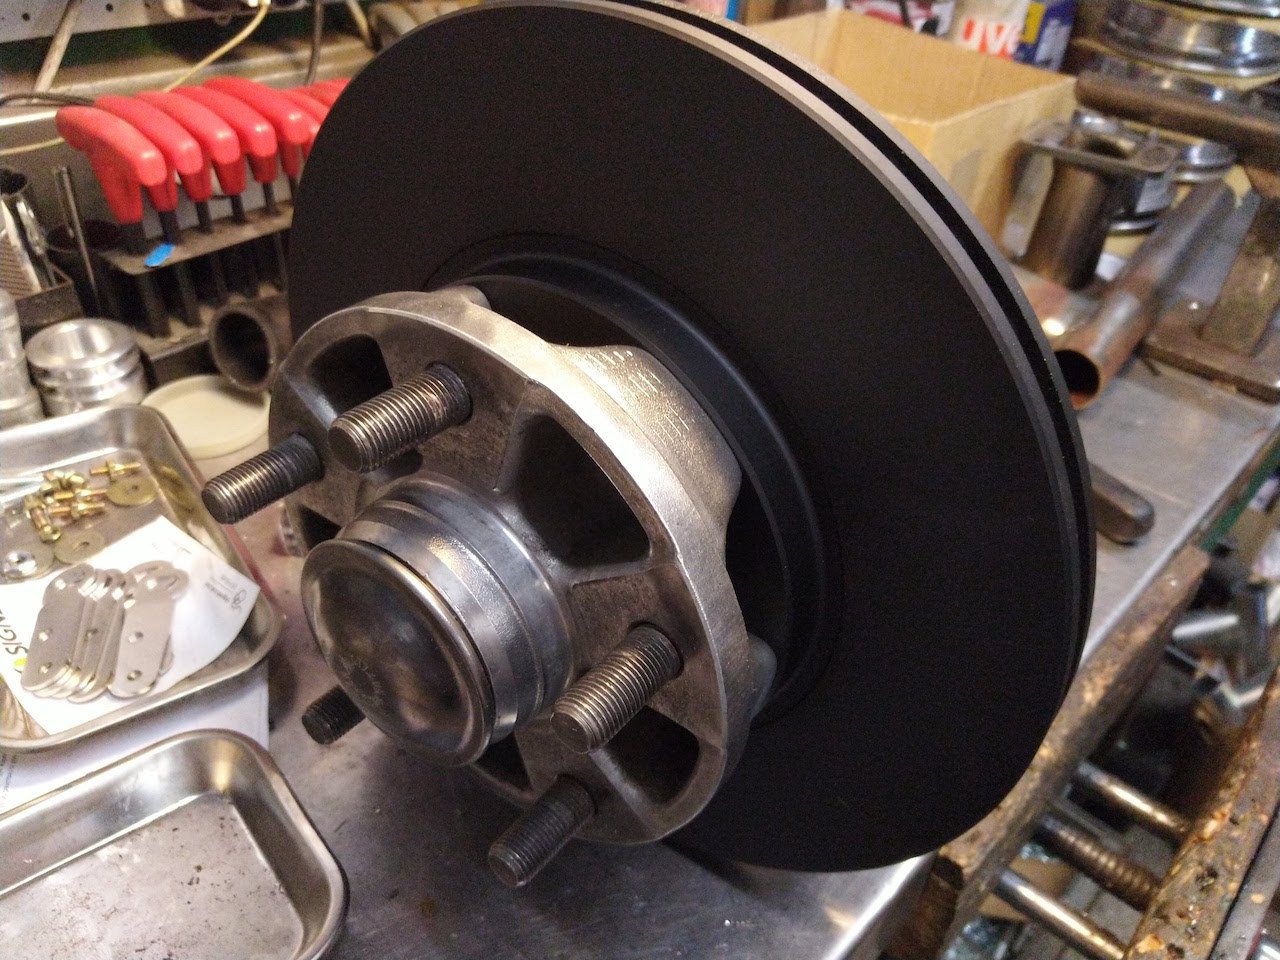
Next on the agenda is to remove the old swing axle suspension and replace it with the IRS unit. At the moment I'm looking for a 944 rear end so that I can transfer the aluminum trailing arms and hubs / disc brakes onto the IRS unit. This is practically a straight swap - evidently even the torsion bars can be used.

Then the front suspension will get overhauled, again 944 / 968 hubs and brakes are going to be fitted, the best option is to go for the later units as they utilize a four pot caliper and larger discs, but this limits you to fitting 16" or larger wheels, and all of the best Porsche wheels are 15".

  2089 Hits
Tags:

T-34 Forums

I've decided that running two lots of forums on the same thing is probably a bit of a waste of my time so I intend to close down the forums on my personal site (www.t-34.co.uk). There's probably not much of value (not in the public forums at any rate) but there is a pretty good thread on the 915 gearbox conversion that I will try to bring across. To do this i will probably have to migrate all of the members across as well.

.

Will keep you posted


  1038 Hits